
Using RequireJS to Compile RxJS into a JavaScript Library
![]()
I’m a big fan of the Reactive Extensions (Rx) .NET library so, naturally, I’ve been keen to try out Reactive Extensions for JavaScript (RxJS) in some of my JavaScript development.
One thing about Rx is that it can become quite pervasive in your code. Once you start using it, you’ll want to use it everywhere.
Now, that isn’t necessarily a bad thing, but if I’m writing a JavaScript library, I don’t want to put people off using it by requiring them to download and include some other third-party stuff as well!
In fact, RxJS is actually a set of libraries: a core library and a bunch of optional extras to incorporate things like time-based event processing, aggregation, etc. This has the advantage that I don’t need to include the parts I don’t use, but it does mean users could be required to download and include 3 or 4 (or more) files just to use my library, depending on how much of RxJS I use.
![]()
The good news is that RxJS has good support for RequireJS.
RequireJS is a JavaScript file and module loader. It also contains an optimization tool to combine and minify the code. In this post I’ll describe how I used this to combine RxJS with my library into a single, minified file which can be used without requiring any other dependencies, and still allow as much flexibility as possible in the way the library can be used, (i.e., without simply replacing the RxJS dependencies with the requirement that it can only be run with RequireJS or similar module loader).
I’ll also touch on how the RequireJS optimizer can be used with Google’s Closure Compiler in advanced mode to get even smaller minified output.
An Example
For illustration purposes let’s start with a simple (and pointless) library that uses some RxJS. We’ll call it myLibrary. myLibrary provides a single function, onSecondsUpdate, which repeatedly calls any function we give it, every second, passing in an incremented integer value each time (0, 1, 2, 3, etc…). myLibrary might look something like this…
myLibrary.js:
(function (window, undefined) {
  var seconds = Rx.Observable.interval(1000);

  window.myLibrary = {
    onSecondsUpdate: function (action) {
        seconds.subscribe(action);
    }
  };
}(this));
The code requires the core RxJS library (rx.js) and also the rx.time.js library to provide the interval function. We could use myLibrary like this…
main.js:
var seconds = document.getElementById("seconds");
myLibrary.onSecondsUpdate(function (s) {
  seconds.innerHTML = s;
});
The result would be that the element in the document with id “seconds” would get its inner HTML set to an increasing integer value every second. See: …wow!
Of course, to use it we need to include all the required scripts in the right order…
<script src="scripts/rx.js"></script>
<script src="scripts/rx.time.js"></script>
<script src="scripts/myLibrary.js"></script>
<script src="scripts/main.js"></script>
Using RequireJS
We can improve this by using RequireJS to resolve and load the dependencies. The RxJS libraries already have support for RequireJS so we just need to add it to myLibrary and main.js. So, without going into any details of the RequireJS API, our library and its usage could be changed to something like…
myLibrary.js:
define (['rx.time'], function(Rx) {
  var seconds = Rx.Observable.interval(1000);

  return {
    onSecondsUpdate: function (action) {
        seconds.subscribe(action);
    }
  };
});
main.js:
require (['myLibrary'], function(myLibrary) {
  var seconds = document.getElementById("seconds");
  myLibrary.onSecondsUpdate(function (s) {
    seconds.innerHTML = s;
  });
});
And then, in the page we’d only need the single script tag for require.js, with a data-main attribute to tell it to start its script loading at main.js…
<script data-main="scripts/main" src="scripts/require.js"></script>Now, that’s taken away the job of worrying about which script tags to add and in what order, but it still requires us (or any user of the library) to make sure the library file and the appropriate RxJS files are available to the loader. In fact, in that respect we’ve made it worse because we now need the require.js file as well!
Maybe the optimization tool could help us with that?…
Introducing the RequireJS Optimizer
The RequireJS optimization tool can look at our dependencies and work out how to combine the code into a single file. By default, it will then minify it via UglifyJS. The tool can be downloaded from the RequireJS download page. The easiest way to use it is with Node (v0.4.0 or later).
So, once we’ve downloaded the optimizer and have an appropriate version of Node installed, we can run it with the -o option, specifying the entry point to our code with the name parameter and the file for the combined and minified output with the out parameter…
Ian.Reah@IANREAH ~rjs-example/scripts
$ node r.js -o name=main out=main.min.js

Tracing dependencies for: main
Uglifying file: c:/Users/ian.reah/rjs-example/scripts/main.min.js

c:/Users/ian.reah/rjs-example/scripts/main.min.js
----------------
./rx.js
./rx.time.js
./myLibrary.js
./main.js
And now we’d just need the two files to run our code: require.js and the output from the optimizer, main.min.js. There are ways to get around having to include require.js as well, but that’s not necessarily what we’re aiming for here. Actually, we don’t want to combine all of the code into a single file at all. We’re looking for a way to combine the library and its dependencies so they can be easily used within our main.js code (and anywhere else we want to make use of the library’s functionality).
Let’s try optimizing just the library file & its dependencies…
Ian.Reah@IANREAH ~rjs-example/scripts
$ node r.js -o name=myLibrary out=myLibrary.min.js

Tracing dependencies for: myLibrary
Uglifying file: c:/Users/ian.reah/rjs-example/scripts/myLibrary.min.js

c:/Users/ian.reah/rjs-example/scripts/myLibrary.min.js
----------------
./rx.js
./rx.time.js
./myLibrary.js
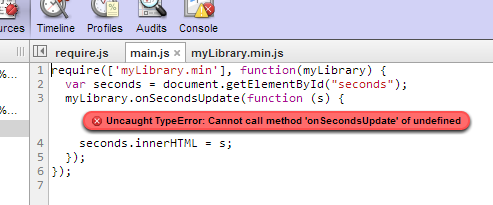
…and then changing our main code to use the minified version of the library…
main.js:
require (['myLibrary.min'], function(myLibrary) {
    ...
});
Oh, the code no longer works. When the main callback function gets called, myLibrary is undefined!
So, what happened?
Well, in the original library code we defined the module without a name so its name gets inferred from the filename. That is, when we say require ['myLibrary'], ... it goes to myLibrary.js. This is the preferred way of defining modules. (It is possible to define a module with a name, but this is discouraged.)
Obviously, the optimization tool needs to add the names to allow more than one module in the same file. This means that in the optimized code, in the myLibrary.min.js file, the library module will be named myLibrary after the file it came from. However, in the main.js code above require (['myLibrary.min'], ... is looking for a module named myLibrary.min in the myLibrary.min.js file.
There are a few approaches to fixing this…
- Rename the minified file to
myLibrary.jsand specify the dependency inmain.jsas['myLibrary']as before. This means the code is back to searching for a module namedmyLibraryin a file calledmyLibrary.jsand everyone is happy again. The down side is that we've moved away from what seems to be the accepted convention of naming minified files as original-name.min.js. - There is a way to leave the minified file with its
.min.jsname and reference the dependency in our main code with the correct name, i.e,require (['myLibrary'], .... To make this work we need to add a path to the RequireJS config...This configuration says, "when a module namedrequire.config({ paths: { "myLibrary": "myLibrary.min" }, });myLibraryis required, look for it in a file calledmyLibrary.min.js". The problem with this solution though is that the configuration has to be done at the point where the library is used, not when we optimize it. So we're putting extra responsibilities on the users of the library where the whole point of this exercise is to make it as simple as possible to use! - Another approach is to add an extra module to the optimized code named
myLibrary.minwhich returns themyLibrarymodule...We can even tell the optimizer to add this extra module for us using thedefine('myLibrary.min',['myLibrary'], function(lib) { return lib; });wrap.endoption:It's perhaps not a very elegant solution, but its advantage is that it is hidden from users of the library. We're giving them a file calledIan.Reah@IANREAH ~rjs-example/scripts $ node r.js -o name=myLibrary out=myLibrary.min.js \ > wrap.end="define('myLibrary.min',['myLibrary'], function(lib) {return lib;});"myLibrary.min.jsso to require it in their code they userequire (['myLibrary.min'], ....
Usage without RequireJS
To recap, we’ve now got two versions of our library:
- The raw JavaScript in
myLibrary.jswhich can be used for development, debugging, or just reading and understanding the code, but needsrx.jsandrx.time.jsto go along with it. - The combined and minified code in
myLibrary.min.jswhich can be used on its own (without the separaterx.jsandrx.time.jsfiles).
The problem we have now though is that, because of the way we have defined the library, both of the above versions can only be used in a project that is using RequireJS (or some other module loader that is compatible with the define/require syntax we’ve used).
To get around this we can look to the RxJS libraries for inspiration. We’ve already been using the RxJS libraries in both settings: a project using RequireJS and one with plain old ‘include the dependencies with script tags’. And I haven’t heard either of them complain once!
If you look at the rx.time.js library we’ve been using, you can see that it achieves this by defining the library in a ‘factory’ function. The ‘factory’ function can get called in various ways depending on which module loader features are detected.
The RxJS code checks for a couple of different flavours of module loaders before falling back to adding to the root object. We could do something similar with our library. (For simplicity, I’ve only included the check for RequireJS or similar. This can be extended to cover other module loader ‘flavours’.)
(function (root, factory) {
  if (typeof define === 'function' && define.amd) {
    // We're using RequireJS, 'define' the library & its dependencies...
    define(['rx.time'], function (Rx) {
      return factory(Rx);
    });
  } else {
    // No RequireJS, fallback to adding to the root object
    // (assume the dependencies are already available on the root)
    root.myLibrary = factory(root.Rx);
  }
}(this, function (Rx) {
  // The actual library definition...

  var seconds = Rx.Observable.interval(1000);

  return {
    onSecondsUpdate: function (action) {
      seconds.subscribe(action);
    }
  };
}));
We also need to do something similar with the myLibrary.min definition we added to the end of the optimized code with the wrap.end option. In this case I don’t think we need any fallback. I’m assuming that anyone using the optimized code without RequireJS would still expect to find a myLibrary object on the root object, not myLibrary.min!
Also, because the code we want to add with wrap.end is getting a bit too complicated to put on a command line we can instead put it in a file (I’ve called the file wrap.end) and then specify the file using the wrap.endFile command line option…
wrap.end:
if (typeof define === 'function' && define.amd) {
  define ('myLibrary.min', ['myLibrary'], function(lib) {
    return lib;
  });
}
compile command:
Ian.Reah@IANREAH ~rjs-example/scripts
$ node r.js -o name=myLibrary out=myLibrary.min.js wrap.endFile=wrap.end

Tracing dependencies for: myLibrary
Uglifying file: c:/Users/ian.reah/rjs-example/scripts/myLibrary.min.js

c:/Users/ian.reah/rjs-example/scripts/myLibrary.min.js
----------------
./rx.js
./rx.time.js
./myLibrary.js
So now both our original library and the optimized version can be used with or without RequireJS…
To use the original library without RequireJS:
Include the scripts…
<script src="scripts/rx.js"></script>
<script src="scripts/rx.time.js"></script>
<script src="scripts/myLibrary.js"></script>
<script src="scripts/main.js"></script>
…and access the library object in main.js…
var seconds = document.getElementById("seconds");
myLibrary.onSecondsUpdate(function (s) {
  seconds.innerHTML = s;
});
To use the original library with RequireJS:
Include the single script tag for require.js, with a data-main attribute…
<script data-main="scripts/main" src="scripts/require.js"></script>…and specify the dependency on the library in main.js…
require (['myLibrary'], function(myLibrary) {
  var seconds = document.getElementById("seconds");
  myLibrary.onSecondsUpdate(function (s) {
    seconds.innerHTML = s;
  });
});
To use the optimized library without RequireJS:
Include the minified script…
<script src="scripts/myLibrary.min.js"></script>
<script src="scripts/main.js"></script>
…and access the library object in main.js (as with using the original library without RequireJS)…
var seconds = document.getElementById("seconds");
myLibrary.onSecondsUpdate(function (s) {
  seconds.innerHTML = s;
});
To use the optimized library with RequireJS:
Include the single script tag for require.js, with a data-main attribute (as with using original library with RequireJS)…
<script data-main="scripts/main" src="scripts/require.js"></script>…and specify the dependency on the minified library in main.js…
require (['myLibrary.min'], function(myLibrary) {
  var seconds = document.getElementById("seconds");
  myLibrary.onSecondsUpdate(function (s) {
    seconds.innerHTML = s;
  });
});
Using the Closure Compiler
If you run the RequireJS optimizer using Java then you also have the option of minifying with Google’s Closure Compiler as an alternative to UglifyJS.
Using the Closure Compiler in advanced mode can achieve much better compression rates. It does this by using more aggressive renaming and applying some other code-shrinking techniques such as dead code removal and function inlining.
In an ideal world, the Closure Compiler would use its dead code removal to detect and strip out the parts of the RxJS libraries that I’m not using. However, I suspect that the way we’ve structured the code (module callbacks, conditional support for different loaders, etc) has made it pretty difficult to analyse statically and detect the dead code with any certainty.
Even so, the advanced optimizations can still make a big difference, but there are a couple of things we need to take care of to get it to work. The effort required will vary from case to case so you need to decide whether it’s worth it!
Firstly, we need to take steps to ‘tame’ the aggressive renaming, otherwise it could get carried away and rename our library and its public functions as well which would make it quite tricky to use! The easiest way to do this is to use strings to name the objects and functions we don’t want renamed. The compiler will never rename anything in a string literal.
So, where we add the library object to the root object in the non-RequireJS case we’d specify it as…
root['myLibrary'] = factory(root.Rx);…instead of…
root.myLibrary = factory(root.Rx);Similarly, where we define the library in the factory function we need to put onSecondsUpdate in quotes to prevent it getting renamed…
'onSecondsUpdate': function (action) ...We also need to give the compiler some ‘hints’ about external code that’s used by our library but not included in the compilation. This is done by declaring externs. There is more information about creating an externs file here. In our case, we need to do this for the RequireJS library, and it would look like this:
externs.js:
var define = {
    "amd": {
        "jQuery": {}
    }
}
One last thing…
I found running the optimizer with Java to be much slower than with Node. This isn’t really a big deal because you’ll probably only be running it once you’ve finished a chunk of development and want to publish your minified file. Anyway, I found it easier (and quicker) to not run the optimizer with Java and instead create a script which ran the optimizer with Node, without minifying the code (optimize=none), and then run the Closure Compiler on the output.
compile.sh:
node r.js -o name=myLibrary out=myLibrary.tmp wrap.endFile=wrap.end optimize=none
java -jar compiler.jar --js myLibrary.tmp --compilation_level=ADVANCED_OPTIMIZATIONS \
  --js_output_file myLibrary.min.js --externs externs.js
The compiler.jar for the Closure Compiler can be downloaded here.
An introduction to Jekyll
![]()
Jekyll is a lightweight static site generator. It takes the raw form of your web content from simple text files and puts them through a markdown converter and template engine to produce static pages suitable for just about any web server.
It is described as being ‘blog aware’ which means that if you put your posts in a specific folder and follow a particular naming convention, then Jekyll can produce everything you need for publishing your blog.
There is plenty of information around on getting your blog set up quickly and easily with Jekyll, which is all well and good but if you want to use it for more than just your blog content or if you’d just like to understand a bit more about how it works, then you’re going to want to dig into it a bit deeper.
The easiest way to install Jekyll is via RubyGems. If you are installing Jekyll on Windows you may also find the instructions here useful.
The Basics
At its most basic level Jekyll will simply copy your web content files directly to its output. So, if you had a folder with a simple HTML file called ‘index.html’ and some css in ‘styles.css’, for example…
index.html:
<!DOCTYPE html>
<html lang="en" xmlns="http://www.w3.org/1999/xhtml">
  <head>
    <link rel="stylesheet" type="text/css" href="styles.css" />
  </head>
  <body>
    <h1>Hello, Jekyll!</h1>
  </body>
</html>
styles.css:
body {
  font-family: 'Myriad Pro', Calibri, Helvetica, Arial, sans-serif;
  color: Red;
}
…and then ran the Jekyll command from that folder…
Ian Reah@IANREAH-PC ~/documents/jekyll
$ jekyll
WARNING: Could not read configuration. Using defaults (and options).
  No such file or directory - c:/Users/Ian Reah/documents/jekyll/_config.yml
Building site: c:/Users/Ian Reah/documents/jekyll -> c:/Users/Ian Reah/documents
/jekyll/_site
Successfully generated site: c:/Users/Ian Reah/documents/jekyll -> c:/Users/Ian
Reah/documents/jekyll/_site
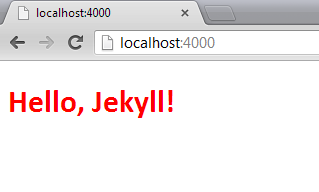
…you would see a new _site folder created containing a copy of the two files. (We’ll come back to that warning about no config file.)
The idea is that the output in the _site folder contains your entire site in a form that can be uploaded straight to your web server. To test your site locally first, just run the jekyll command with the --server option. This will start a simple web server on port 4000.
Ian Reah@IANREAH-PC ~/documents/jekyll
$ jekyll --server
WARNING: Could not read configuration. Using defaults (and options).
  No such file or directory - c:/Users/Ian Reah/documents/jekyll/_config.yml
Building site: c:/Users/Ian Reah/documents/jekyll -> c:/Users/Ian Reah/documents
/jekyll/_site
Successfully generated site: c:/Users/Ian Reah/documents/jekyll -> c:/Users/Ian
Reah/documents/jekyll/_site
[2012-12-23 12:58:18] INFO  WEBrick 1.3.1
[2012-12-23 12:58:18] INFO  ruby 1.9.3 (2012-04-20) [i386-mingw32]
[2012-12-23 12:58:18] INFO  WEBrick::HTTPServer#start: pid=8856 port=4000
Then you can test your site by browsing to http://localhost:4000/
Writing your content in Markdown
Ok, so maybe copying files over to a different folder for uploading to your web server isn’t all that useful. Of course, there’s more to Jekyll than that. For a start there’s that markdown converter I mentioned earlier…
With markdown you can create your content using a much more lightweight and less verbose syntax. Then you can use Jekyll to generate the raw HTML for your site.
Now, if you had a folder with your web content in markdown files and ran the Jekyll command from that folder it would just copy the markdown files directly to the output folder as it did with the HTML example we saw earlier.
To tell Jekyll that the file requires processing before being copied then the file needs to begin with a YAML front matter block. A YAML front matter block is surrounded by triple-dashed lines. We’ll look at what sorts of things you can define within the YAML front matter block later, but for now an empty block is enough to tell Jekyll to process the markdown files through its converter.
For example, if you replaced the ‘index.html’ file from the earlier example with an equivalent markdown file containing the empty YAML front matter block at the start…
index.md:
---
---

# Hello, Jekyll! #
…and ran the Jekyll command again then this time, rather than simply copying the markdown file, you’d get an index.html file in the _site output folder containing the processed markdown.
If you test the site with the Jekyll --server option you’ll see the output from the processed markdown file is almost identical to our first example with the raw HTML file.
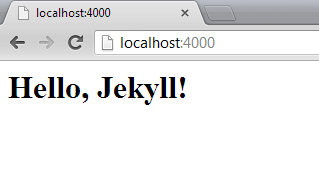
As you’ve probably already worked out, the reason it doesn’t look exactly like the output from the first example is that we’ve lost the link to the stylesheet. In the next section, we’ll look at using layouts to get that back.
Introducing Layouts
In Jekyll layouts are written using the Liquid templating language and stored in the _layouts subfolder. The layout to use for a particular file is specified in the file’s YAML front matter, as shown below…
index.md:
---
layout: mylayout
---

# Hello, Jekyll! #
The layout to use for this page would then be defined in a ‘mylayout.html’ file and placed in the _layouts folder. The {{ content }} tag is used to inject the page content into the layout. For example, the layout shown below can be used to place the processed content from our markdown into an HTML page containing a link to our stylesheet…
_layouts\mylayout.html:
<!DOCTYPE html>
<html lang="en" xmlns="http://www.w3.org/1999/xhtml">
  <head>
    <link rel="stylesheet" type="text/css" href="styles.css" />
  </head>
  <body>
    {{ content }}
  </body>
</html>
As you’d expect from a templating system, the Liquid markup language provides syntax for defining logic in your templates including conditional and looping logic. For more information see the reference here.
Jekyll Configuration
The configuration options for your site can be specified in a _config.yml file in the site’s root directory. Creating _config.yml will get rid of that warning we’ve been getting from Jekyll when building the site, and opens up a whole host of configuration options. Adding auto: true to this file is a very useful option for ongoing development, because it will then watch for file changes and automatically rebuild your site. This means you can edit your site content, save the changes and refresh your browser to see the effect.
(Note that even with the auto: true option, changes to the _config.yml file will not be automatically picked up. If you change any options, you need to stop and restart the server after saving the changes.)
Check here for a list of the configuration options and details of the default configuration.
You can also set various configuration options on a page by page basis in the file’s YAML front matter block. We’ve already seen the use of the layout option for specifying which template to use for the page. Details of the other page options are available here.
The most powerful aspect of the Jekyll configuration is that, as well as the predefined options, you can also add custom configuration data. This can be defined at both the site level (by adding custom options to the _config.yml file) and at the page level (by adding custom options to a file’s YAML front matter).
All of the configuration data is made available to the templating engine during conversion. The site level data from the _config.yml can be accessed from a layout template through the site variable. Similarly, the page level data from each file’s YAML front matter is available from a layout template through the page variable. See here for more details.
Bringing it together
Hopefully you should now be beginning to see the power of Jekyll. The ability to maintain your site content using the lightweight markdown language and combine the conversion of the markdown with the Liquid template engine and flexible template data configuration enables you to ‘concoct your sites in any way you can dream up’!
As a simple worked example, try adding some custom data to the _config.yml to specify details of the pages to include in the site’s navigation area…
_config.yml:
navigable-pages:
  - title: home
    url: /index.html
  - title: projects
    url: /projects.html
  - title: about
    url: /about.html
…and then update the markdown file to add some title and date information to the YAML front matter block…
index.md:
---
layout: mylayout
title: An introduction to Jekyll
date: 2012-12-27 16:16:00
---

Hello, Jekyll!
Now, the data we added to the _config.yml will be made available from the layout templates as site.navigable-pages and the data we added to the markdown file’s YAML front matter block will be available in the page.title and page.date variables. We can then extend our previous template to build a navigation menu and include the page title and date before the main content…
_layouts\mylayout.html:
<!DOCTYPE html>
<html lang="en" xmlns="http://www.w3.org/1999/xhtml">
  <head>
    <link rel="stylesheet" type="text/css" href="styles.css" />
  </head>
  <body>
    <header>
      <ul id="menu">
        {% for node in site.navigable-pages %}
          <li><a href="{{ node.url }}">{{ node.title }}</a></li>
        {% endfor %}
      </ul>
    </header>
    <h1>{{ page.title }}</h1>
    <p>{{ page.date }}</p>
    <hr />
    {{ content }}
  </body>
</html>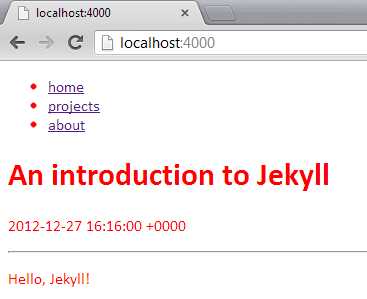
Of course, you’re going to want to spend a bit more time with the styling but you get the idea!
Summary
- At its most basic level, Jekyll simply copies your site files to its output, the _site folder.
- Any file containing a YAML font matter block at the start of the file will be processed first.
- A file or folder beginning with an underscore (_) will not be included as part of the site.
- Jekyll treats some files and folders as special data used in the generation of the site. (We’ve seen the special _config.yml file and _layouts folder. For a description of the other special files and folders see here.)
- The site is generated by running the
Jekyllcommand. The generated _site folder can then be uploaded straight to your web server. - You can test the site locally by using the
--serveroption. Add theauto: trueoption to the _config.yml to aid ongoing development and local testing. - Layouts are written in the Liquid templating language and the layout to use for a file is defined in its YAML front matter block using the
layoutoption. - Any site-wide configuration options specified in the _config.yml file are made available from the layouts via the
sitevariable. - Page-specific configuration options included in the page’s YAML front matter are available from the layouts via the
pagevariable. - As well as any predefined options, the _config.yml file and YAML front matter blocks can include any custom data.
Obviously, the information outlined here will only give you the very basics for a site. There’s still a lot to consider, such as enabling comments on your posts, adding search capabilities, and an RSS feed, etc. There can be no denying that maintaining a site this way requires more work compared to using a more feature rich CMS or blogging tool. Personally, though, I am enjoying the flexibility, challenges and satisfaction of having much more control over the site.
If you’re still interested in knowing more there’s an excellent step-by-step tutorial here which goes into some of the more finer details of building a site with Jekyll.
MockStock and Two Smoking Libraries...
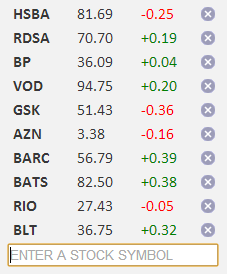
…or, using SignalR and Rx to simulate a real-time web application.
Introduction
In this post I’ll outline the implementation of a fake stock price subscription service. It’ll focus mainly on the use of SignalR to transmit the stock price data to the clients and also summarize the use of Rx to generate the real-time sequences of price updates.
To make the application (semi-) realistic I came up with the following requirements:
- The prices can be randomly generated, with random fluctuations (say, ±0.5) at random time intervals (around every second, or so)
- Multiple clients subscribed to the same stock should however see the same stream of random prices.
- It shouldn’t waste time sending price updates to a client that isn’t watching that stock.
In other words:
- We need a way to simulate the real-time nature of the price data.
- We need a way of transmitting the same data to a group of clients in real-time.
- We need to track client subscriptions to manage the lifetime of the subscriptions.
My question was: “Can I use SignalR and Rx to do this effectively?”
SignalR + Rx
Rx (or Reactive Extensions) is a library for creating and composing asynchronous streams of data using observable sequences and LINQ-style query operators.
SignalR is an integrated client-and-server library to help build real-time, multi-user interactive web applications.
It seems there’s a lot of potential for using these libraries in a very complementary manner - where Rx presents a stream of data in a timely manner and SignalR transmits this data in real-time to appropriate clients.
Rx does have a bit of a learning curve as it encourages a change in the way you approach certain coding problems. With Rx, your code becomes less imperative and more declarative which typically results in less code, more maintainable code and can help to manage complexities like concurrency, etc. introtorx.com is a great resource for learning Rx.
On the other hand, SignalR’s main purpose is to make it incredibly simple to add real-time web functionality to your application so (by design) it is very easy to get started with SignalR…
Getting started with SignalR
Simply install the SignalR NuGet packages into your web application and create a class derived from SignalR.Hubs.Hub…
public class StockHub : Hub
{
}
To expose methods on the hub that you want to be callable from the client, simply declare them as public methods…
public class StockHub : Hub
{
    public void Subscribe(string symbol)
    {
        ...
    }

    public void Unsubscribe(string symbol)
    {
        ...
    }
}
If you run your application and go to /signalr/hubs in your browser (e.g., http://localhost:54115/signalr/hubs) you should see some JavaScript that has been dynamically generated based on the Hub classes you declared. For example, with the StockHub class shown above, you’ll see the following JavaScript object somewhere near the bottom of /signalr/hubs. The two methods on the StockHub class are reflected on the JavaScript object, (with a slight difference in the casing of the method names, which I assume is purely to match the coding standards in each language).
signalR.stockHub = {
    _: {
        hubName: 'StockHub',
        ignoreMembers: ['subscribe', 'unsubscribe'],
        connection: function () { return signalR.hub; }
    },

    subscribe: function (symbol) {
        return invoke(this, "Subscribe", $.makeArray(arguments));
    },

    unsubscribe: function (symbol) {
        return invoke(this, "Unsubscribe", $.makeArray(arguments));
    }
};
This object can be accessed in your client-side JavaScript through the SignalR jQuery plugin, $.connection. Calling functions on the object will effectively invoke the equivalent methods on the server…
<script src="Scripts/jquery-1.7.2.min.js" type="text/javascript"></script>
<script src="Scripts/jquery.signalR.min.js" type="text/javascript"></script>
<script src="/signalr/hubs" type="text/javascript"></script>

<script type="text/javascript">
    $(function () {
        // Get our stockHub JavaScript object
        var stockHub = $.connection.stockHub;

        // Set up a handler to call the 'subscribe'
        // method on the server
        $("#form1").submit(function () {
            stockHub.subscribe('XYZ');
        });

        // Start the connection
        $.connection.hub.start();
    });
</script>
You can also add functions to the JavaScript object to make them callable from the server…
// Add a function to the JavaScript object
// to call from the server
stockHub.updatePrice = function (stockPrice) {
    ...
};
In the server’s hub class, use the dynamic property, Clients, to call functions on the client object…
public class StockHub : Hub
{
    private void PriceUpdated(StockPrice newPrice)
    {
        Clients.updatePrice(newPrice);
    }
}
The above will call the updatePrice function on all clients. To fulfill our requirement of only sending price updates to clients that have subscribed to that stock we can use the hub’s Groups property…
public class StockHub : Hub
{
    public void Subscribe(string symbol)
    {
        // Add the calling client (Context.ConnectionId) to a group
        // using the stock symbol as the group name...
        Groups.Add(Context.ConnectionId, symbol);
    }
}
So now, when a client subscribes to a stock, it calls our Subscribe method on the hub object and the server will add it to a group based on the stock symbol. Similarly, we can implement the Unsubscribe method to remove clients from the group when they no longer want to subscribe to a particular stock…
public void Unsubscribe(string symbol)
{
    Groups.Remove(Context.ConnectionId, symbol);
}
When we have an update for a stock price we can now send it to only those clients interested in that stock by sending it to the group, as shown…
private void PriceUpdated(StockPrice newPrice)
{
    Clients[newPrice.Symbol].updatePrice(newPrice);
}
The Clients, Groups and Context properties of the hub provide the flexibility to send messages to all clients, a specific client, groups of clients, only the calling client, etc. For more information check the hub documentation.
Adding some Rx
There’s actually not much to the Rx in this example. This is partly because, by its nature, you end up being able to do quite a lot with a little code in Rx. Hopefully it’s enough to show the potential of putting these libraries together in more complex situations.
The first time a stock is subscribed to the price feed gets generated as an observable sequence of StockPrice using the static Observable.Generate method…
var random = new Random();
IObservable<StockPrice> priceFeed = Observable.Generate(
        new StockPrice(symbol, random.NextDouble() * 100),
        p => true,
        p => p.NextPrice(random.NextDouble() - 0.5),
        p => p,
        p => TimeSpan.FromSeconds(random.NextDouble() + 0.5)
);
This generates the observable sequence starting with an initial state (which is specified by the first parameter - a new StockPrice with a random starting price between 0 and 100). The sequence continues until a condition fails. The second parameter specifies the condition. In our case, p => true, means the sequence will continue indefinitely. The third parameter specifies how to produce the next value in the sequence. The NextPrice method on our StockPrice object adjusts the stock price with a given random fluctuation and returns it. The fourth parameter is a selection function to specify how to present the values in the sequence. In our case, we just want to present the StockPrice objects. The time span function in the last parameter controls the speed the values are produced. Again, we provide a random value so that values will appear in the sequence between 0.5 and 1.5 seconds after the previous one.
Check out the MSDN documentation for details of the other Observable.Generate overloads.
Next we subscribe to the priceFeed observable to send the updates to the appropriate group of clients as described in the previous section…
IDisposable subscription = priceFeed.Subscribe(p => Clients[p.Symbol].updatePrice(p));Notice that the Subscribe method on an observable returns a disposable token that we can keep hold of and dispose when all clients have unsubscribed from the stock. This will stop the observable from producing price updates when there are no longer any clients interested in the stock.
So now, adding and removing clients from the hub’s Groups, as shown in the previous section, will result in the streams of stock price updates being transmitted in real-time to the appropriate clients.
A couple of Gotchas
As I’ve already suggested, the beauty of SignalR is that it hides away a load of low-level complexity making it very simple to use. As with all these things though, it’s important to understand just a little bit of what’s going on behind this abstraction. Here are a couple of things you might need to be aware of when working with SignalR…
A new hub object is created on the server for every client call. The hub objects themselves have no state about the clients. It might seem like the Clients and Groups properties are maintaining some static data about all clients, but they don’t - all that is handled “under the hood”. This means you may have to keep your own data about what connections are in what groups. In this example it meant keeping track of which clients were subscribed to which stock so I could manage the lifetime of the price feed observables.
Also, the SignalR library is written in a very asynchronous way. So, you’ll see methods in the server code that, instead of blocking to return a value, will return its value asynchronously with a Task<TResult>. Likewise, on the client most methods return a jQuery deferred object. This means you might get into trouble if you try to do things sequentially. For example…
// Get our stockHub JavaScript object
var stockHub = $.connection.stockHub;

// Start the connection
$.connection.hub.start();

// Subscribe to a stock immediately after starting the connection - nope...
// Uncaught Error: SignalR: Connection must be started before data can be sent.
stockHub.subscribe('XYZ');
We’re actually calling the hub method before the connection has started. We’d need to do…
// Get our stockHub JavaScript object
var stockHub = $.connection.stockHub;

// Start the connection
$.connection.hub.start().done(function() {
    // Subscribe to a stock as soon as the connection is started
    stockHub.subscribe('XYZ');
});
Summary
Hopefully this simple example has shown the potential of using these two libraries together in a real-time web application. The code is available on GitHub, and you can see it in action here.
In more complex situations where you might need to combine the data from multiple concurrent sources, and/or, throttle the data going to the clients, for example, then the use of Rx to present the data to be transmitted to the clients via SignalR could greatly simplify the solution.
It’s also worth bearing in mind the availability of Rx for JavaScript opening up the possibility of pushing Rx notifications directly to the client with SignalR. (See SignalR.Reactive for an example of a library enabling this.)
About
I work as a Software Developer at Nonlinear Dynamics Limited, a developer of proteomics and metabolomics software.
My day job mainly involves developing Windows desktop applications with C# .NET.
My hobby/spare-time development tends to focus on playing around with some different technologies (which, at the minute seems to be web application development with JavaScript).
It’s this hobby/spare-time development that you’re most likely to read about here.
Ian Reah