
A CoverFlow control implemented with KnockoutJS
Last time I outlined the approach I’m experimenting with to implement a CoverFlow control that will work well even with a large collection of albums. I’ve implemented it using the MVVM pattern with the help of KnockoutJS, so in this post I’m going to describe some of the implementation details relating to the use of KnockoutJS in the project.
KnockoutJS is a JavaScript MVVM library. In a nutshell, you implement your view models in JavaScript using observables, and annotate your markup to describe bindings between the UI and these observables. This helps to give you a clear separation between the UI components and the data being displayed and, by automatically updating the right parts of the UI when the data changes, it usually simplifies your code.
An introduction to observable properties
The backbone of the control is an unordered list containing images of the album covers. For this demonstration I’m using the image placeholder service placehold.it for the image urls. Without any styling or knockout bindings the markup will look something like this…
<ul>
<li><img src="http://placehold.it/100x100&text=1"></li>
<li><img src="http://placehold.it/100x100&text=2"></li>
<li><img src="http://placehold.it/100x100&text=3"></li>
<li><img src="http://placehold.it/100x100&text=4"></li>
<li><img src="http://placehold.it/100x100&text=5"></li>
<li><img src="http://placehold.it/100x100&text=6"></li>
<li><img src="http://placehold.it/100x100&text=7"></li>
<li><img src="http://placehold.it/100x100&text=8"></li>
<li><img src="http://placehold.it/100x100&text=9"></li>
</ul>We’re going to use KnockoutJS to generate this.
We’ll start with a JavaScript view model object to represent an individual item
in this list. For now, let’s just give it a single property: imageSource, which
defines the source url for the image we want it to display.
function ItemViewModel(sourceUrl) {
  this.imageSource = sourceUrl;
}

var vm = new ItemViewModel("http://placehold.it/100x100&text=1");
ko.applyBindings(vm);
That call to ko.applyBindings is important. For this simple example you can
think of it as activating KnockoutJS
by telling it which view model object to associate with the bindings
in the markup. We’ll look at how to define the bindings in the markup
next.
To use the value of the imageSource property as the source url for an
image element we can use the attr binding.
For example, the following in the main body of your page…
<img data-bind="attr: {src: imageSource}"/>…should give you something like this…
This can be useful in itself, but we haven’t really bound the property to the source url. Try adding the following JavaScript that changes the value of the view model property and see what happens…
var n = 1;
setInterval(function () {
    vm.imageSource = "http://placehold.it/100x100&text=" + (++n);
}, 2000);
Oh - nothing happens. Even though the view model property is being updated every 2 seconds the image source url is not updated after the initial value. To get that behaviour we have to turn the view model property into a KnockoutJS observable property.
The changes to do that are very small in terms of the code, but it actually means quite a significant change to the way you’ll work with your view model properties. Let’s look at the changes first and then I’ll explain what I mean.
To turn the property into an observable simply wrap it’s initialisation in a call
to ko.observable…
function ItemViewModel(sourceUrl) {
  this.imageSource = ko.observable(sourceUrl);
}
The ko.observable function records the initial value for the property (the
value passed in to the function) and returns a function. The returned function
is what you use to interact with the property:
- Call it with no parameters to get the current value of the property, e.g.,
var currentFoo = viewModel.foo(), - Update the value of the property by calling the function with the new value
as the parameter, e.g.,
viewModel.foo("new value"). The function then takes care of notifying any subscribers of the new value.
The important point is that the member on the view model is now a function and not a simple property. Make a note of that. Really - write it down on a post-it and stick it to your monitor or whatever. You will forget. After you’ve been using KnockoutJS for a while and you’re working ‘in the zone’, you’ll forget and write some code like…
viewModel.foo = "new value";…and then waste a lot of time working out why the UI is no longer updating. Remember - access to the observable property is through a function…
viewModel.foo("new value");Now the image source attribute really is bound to the value of the view model. Try the following again and make sure you see the image change every two seconds.
var n = 1;
setInterval(function () {
    vm.imageSource("http://placehold.it/100x100&text=" + (++n));
}, 2000);
Binding to collections
If you read the previous post describing the overall approach of the control you’ll remember that the control is always going to contain 9 items. Items will be added to one end and removed from the other as we move through the control. This can easily be handled with KnockoutJS and observable arrays.
Let’s introduce another view model that maintains an array of our ItemViewModels.
function CoverFlowViewModel() {
  var itemsArray = [];
  for (var i = 1; i < 10; i++) {
    itemsArray.push(new ItemViewModel("http://placehold.it/100x100&text=" + i));
  }

  this.items = ko.observableArray(itemsArray);
}

var vm = new CoverFlowViewModel();
ko.applyBindings(vm);
Notice that the items property is turned into an observable array by passing
the underlying array to ko.observableArray.
The UI can be created using the foreach binding…
<ul data-bind="foreach: items">
    <li><img data-bind="attr: {src: imageSource}"/></li>
</ul>
Which actually produces the markup I showed earlier…
<ul>
<li><img src="http://placehold.it/100x100&text=1"></li>
<li><img src="http://placehold.it/100x100&text=2"></li>
<li><img src="http://placehold.it/100x100&text=3"></li>
<li><img src="http://placehold.it/100x100&text=4"></li>
<li><img src="http://placehold.it/100x100&text=5"></li>
<li><img src="http://placehold.it/100x100&text=6"></li>
<li><img src="http://placehold.it/100x100&text=7"></li>
<li><img src="http://placehold.it/100x100&text=8"></li>
<li><img src="http://placehold.it/100x100&text=9"></li>
</ul>Can you see what happened there? The inner markup within the foreach binding
gets repeated for every item in the items property. Each copy of the markup is
bound to the corresponding item in the array, so the bindings are interpreted in
the context of each ItemViewModel.
The observableArray has a lot of the same functions as a normal JavaScript array,
(push, pop, shift, unshift, etc). So, unlike observable properties, a lot
of the time you’ll be working with them as if they were a normal array. The big
difference being that everytime you add or remove items then the UI will
automatically update.
Let’s illustrate this with a setInterval again. The following code removes
the first item from the start of the array and pushes it back on to the end
of the array, every 2 seconds.
setInterval(function () {
    var removed = vm.items.shift();
    vm.items.push(removed);
}, 2000);
If you run it now you’ll see the images in the unordered list rotating. Hopefully you can see that this actually takes us well on our way to a complete CoverFlow control, with a relatively small amount of code. With some CSS and animations it shouldn’t take too much effort to go from the above simple example to a complete CoverFlow control.
You can do a lot with the basics of KnockoutJS that we’ve covered here. That’s pretty much all you need to know to get started but of course there’s a lot more to it. To finish, I’m going to briefly mention some of the more advanced aspects of using KnockoutJS that I’ve picked up during this project. It’s by no means exhaustive. Have a look through the tutorials and documentation to see what else you can pick up.
Some (slightly more) advanced KnockoutJS
1. You can update the underlying array of an observableArray and then poke it to notify its observers
In the previous example we illustrated moving through the coverflow by removing an item from the front of the control and adding a new one to the end…
observableArray.shift();
observableArray.push(...the next CoverFlow item...)
This produces two update notifications: one after the shift operation and one
after the push. It doesn’t really make that much difference in this case, but
if you wanted to make a lot of changes to an observableArray without causing a
lot of UI updates you can make the updates on the underlying array and then
call valueHasMutated on the observableArray to produce a single update.
underlyingArray.shift();
underlyingArray.push(...the next CoverFlow item...);

observableArray.valueHasMutated();
Rate-limiting the notifications is another approach to controlling the number of updates which may be more appropriate in some situations.
2. You can define an observable as a function that depends on other observables. It will automatically update and notify when any of the dependencies change
These are called computed observables. Remember our very first view model example?…
function ItemViewModel(sourceUrl) {
  this.imageSource = ko.observable(sourceUrl);
}
We updated the imageSource like this…
var n = 1;
setInterval(function () {
    vm.imageSource("http://placehold.it/100x100&text=" + (++n));
}, 2000);
Notice how it’s only the integer at the end of the url that changes? We could define this using an observable property for the number and a computed observable for the url…
function ItemViewModel(index) {
  this.index = ko.observable(index);

  this.imageSource = ko.computed(function() {
    return "http://placehold.it/100x100&text=" + this.index();
  }, this);
}
Whenever the index observable updates then the imageSource computed observable
will also get an update. The following produces the same behaviour as the previous
example…
var n = 1;
setInterval(function () {
    vm.index(++n);
}, 2000);
As often with JavaScript, you have to think about the context within a function
and the function used to define the computed observable is no different. The
second paramater to the ko.computed function specifies the value of this
when evaluating the function. In this example, we pass in a reference to the
view model itself enabling us to reference view model properties like this.index().
3. You can use observables to manipulate an element’s CSS class and style from the view model
The CSS binding adds or removes named CSS classes.
As a quick example, take our simple view model again but add a slidingStatus
property…
function ItemViewModel(sourceUrl) {
  this.imageSource = ko.observable(sourceUrl);
  this.slidingStatus = ko.observable("slide-reset");
}
Bind the property to the element using the css binding…
<img data-bind="attr: {src: imageSource},
                css: slidingStatus"/>
The element will then get the slide-reset CSS class.
Now, setting the property on the view model with vm.slidingStatus("slide-left"),
for example, will remove the slide-reset class from the element and add
the new value (slide-left).
Try this to see it in action:
Create some appropriate CSS classes…
img {
    transition: all 0.5s;
}

.slide-left {
    transform: translateX(-100px);
}

.slide-right {
    transform: translateX(100px);
}

.slide-reset {
    transform: translateX(0px);
}
…and add some JavaScript to update the property on the view model…
var n = 0;
var statusses = ["slide-left", "slide-reset", "slide-right", "slide-reset", ]
setInterval(function () {
    vm.slidingStatus(statusses[n]);
    n = (n + 1) % 4;
}, 2000);
You can also add/remove a class based on the value of an observable. See the documentation for more details.
The style binding is similar but sets specific style values directly instead of via a CSS class.
<img data-bind="attr: {src: imageSource},
                css: slidingStatus,
                style: {transitionDuration: duration() + 's'}"/>
This updates the element’s style.transitionDuration property as the duration
observable changes.
4. You can keep your event handlers on the view model with KnockoutJS event binding
Add an event binding to an element like this…
<ul data-bind="foreach: items,
               css: slidingStatus,
               style: {transitionDuration: duration() + 's'},
               event: {webkitTransitionEnd: completeTransition}">
...
</ul>
…and then define the handler function on your view model…
this.completeTransition = function(data, event) {
  ...
};
The completeTransition function gets called when the webkitTransitionEnd event
is triggered for the ul element. So, in the CoverFlow control whenever we
transition from one item to the next (or previous), this function gets called
when the animations have finished. I use this to turn off the animations and shuffle
the items in the control (remove one from one an end and add a new one to the
other end), and reset the position (slidingStatus) of the control so it looks
like one smooth transition to the user. I described this process in more detail
in my previous post
but now you should be able to see how I implemented it using KnockoutJS.
Conclusion
That about covers all the aspects of KnockoutJS that I used in this project. You can see the complete code on GitHub or have a play around with it in action. It’s not perfect and there’s still plenty of room for improvement but it does work better with large collections than my previous attempts. Also, I think I’m done with my CoverFlow obsession - at least for now…
The One Where I Knock Out Another CoverFlow

...see what I did there? Knock Out / Knockout? Ah, never mind.
TL;DR
I’m experimenting with a CoverFlow control for a Spotify App. I want it to work well even with a large collection of albums. This post describes the approach I’m taking.
I’m implementing it using the MVVM pattern with the help of KnockoutJS, so I’m going to come back and write up some of that later in another post.
I’ve made a few CoverFlow controls already - I’m worried it’s becoming an obsession!
The first was my Spotify App, Spotify-LibBrowser. The Spotify App environment doesn’t support CSS3 3D transforms so I wasn’t able to give it the familiar three-dimensional CoverFlow formation.
I wanted to see how it could be done with CSS3 3D transforms so next I made this control. And then, just for fun, I implemented the same thing in Silverlight! (I even wrote a CodeProject article about those last two.)
The trouble is… I’m not happy with any of them!
They all take the same basic approach. The control contains all of the items laid out side-by-side. The whole control is moved horizontally (left or right) to keep the current item central. The items are then scaled/rotated/hidden to give the desired CoverFlow formation. All of these movements are animated.
This works ok(-ish) for a relatively small number of items, but try to smoothly animate the above movements when the control contains hundreds of items and is much wider than the display…well, that’s a big ask! So I thought I’d have another go with a different approach…
Caveat: The main motivation for doing this is for my Spotify App as it currently has some major performance issues with large music libraries. It contains some WebKit specific stuff because that’s the engine Spotify Apps use. It probably won’t look right in non-WebKit browsers. Also, because the Spotify App environment doesn’t support 3D transforms, I’m just using a flat layout - using scaling and opacity to give the impression of depth. It should be possible to add a few CSS3 transforms to get the three-dimensional formation mentioned earlier.
The Basic Layout
With this approach the control will only ever contain 9 items, including a hidden one at each end (shown in red below). The reason for the hidden items should become clear soon.
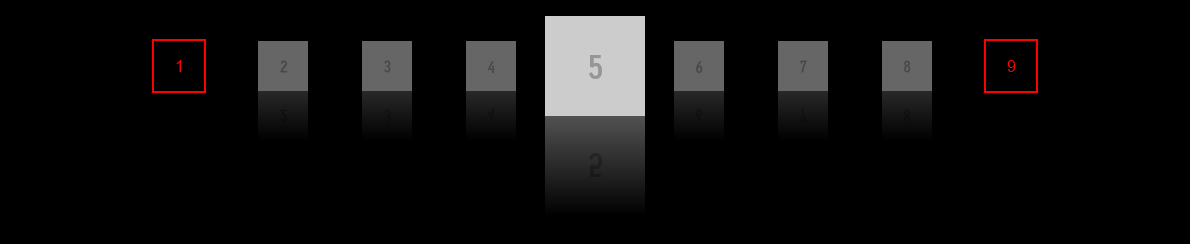
Moving to the next CoverFlow item consists of the following co-ordinated, animated actions:
- Slide the whole control one step to the left. (Where a step is equal to the distance between adjacent items.)
- Fade in the right-most (currently hidden) item. (Number 9 in the above diagram.)
- Fade out the second-from-left item. (Number 2 in the above diagram.)
- Reset the scale and opacity of the old current item. (Make number 5 look the same as the other items.)
- Increase the scale and opacity of the new current item. (Make number 6 look like number 5 used to look.)
The control will now look like this…

At this point, with a magician’s sleight of hand, we turn off animations and:
- Remove the first item from the control
- Push a new item onto the end
- Move the whole control back to its initial position
By turning the animations off these last three things happen in the blink of an eye. The user shouldn’t notice any change but the control will now look like this…
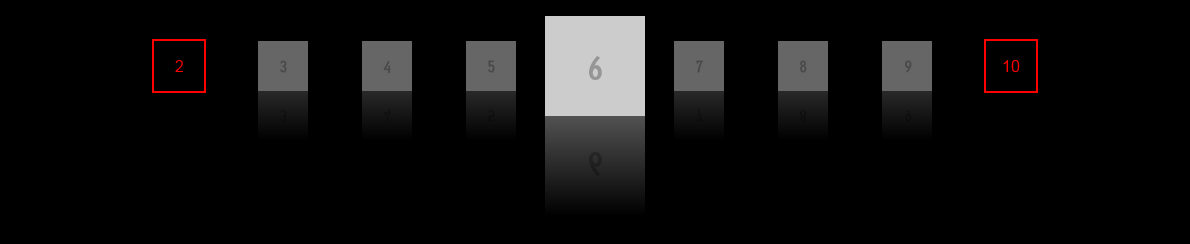
…which actually is exactly where we started except that the items have all moved one place to the left. We’ve also dropped one item off the left and added a new one to the right. This means we’re now ready to repeat the process if we wanted to move to the next item again. (Or, move to the previous item using the same process but with the directions reversed.)
The advantage of this approach is that we can now have a CoverFlow with a potentially infinite number of items but the control only ever has to deal with 9 of them at a time.
You can have a play with it in action. It might make it easier to follow what’s going on. (And remember - I’m aiming to get this into a Spotify App so some of the CSS is WebKit specific.) The code is also available on GitHub.
Just like my first Spotify App, I chose to follow the Model-View-View Model (MVVM) pattern with the help of KnockoutJS - hence the ridiculous pun in the title. (Sorry!). I’m going to focus on that aspect of the implementation in another post.
Gruntifying a Spotify App

I promised myself that the next time I was going to do any JavaScript development I’d clean up my act and put an automated build process in place first.
Well it looks like my next JavaScript project is going to involve my Spotify App, Spotify-LibBrowser; I ran it for the first time in a while the other day and noticed some serious performance issues that need to be addressed if it’s to remain usable in new versions of Spotify.
Now, just because it’s not a typical stand-alone application doesn’t mean it shouldn’t benefit from the efficiency and code quality improvements that a good build process can help provide. Spotify Apps are created using HTML5, CSS and JavaScript, so there’s no reason why they can’t make use of many of the same tools and technologies available to more standard web applications.
Because this was my first experience with most of these tools I’ve written this post as a log of how I did it. I use JSHint to provide static code analysis to make sure the JavaScript complies with a good set of coding standards and Jasmine to add some unit tests to the code.
I used Grunt to automate these tasks, and finally, I set up a continuous integration build on Travis just to give that extra feedback and confidence that everything is running smoothly.
Setting up Grunt
Grunt runs on Node.js so, if you haven’t already got it, you’ll need to install that first. It’s really easy to install (even on Windows)!
The recommended way to get Grunt set up is to install the Grunt CLI globally, (so you can run grunt commands from any
folder), but install the actual Grunt task runner (and specific task plug-ins) locally. This allows you to have different
projects running on different versions of the Grunt task runner and you won’t risk breaking existing projects by
installing a newer version for a new project.
Seeing as we’ve got Node.js now we might as well use the Node package manager (npm) to get grunt installed. The following command installs the Grunt CLI globally…
Ian.Reah@IANREAH ~/Spotify-LibBrowser (master)
$ npm install -g grunt-cli
Next we need to install the task runner locally, but before we do that let’s just think ahead a bit. Put yourself in the shoes of a developer coming to your project and wanting to contribute. What we don’t want to do is scare them off with a long list of instructions on getting set up…‘install version X of Y here, put Z in this folder, etc’! Well, if we take a bit of care here and with the help of npm we can make things a lot easier for them (or even for your future self when you come to set up your project on a new device).
First create a package.json file in the root of your project. It can be pretty minimal for now. At the very least
it needs a name and a version property…
{
  "name": "Spotify-LibBrowser",
  "version": "0.1.0"
}
Now install the Grunt task runner locally with the following command. (Notice the --save-dev option.)
Ian.Reah@IANREAH ~/Spotify-LibBrowser (master)
$ npm install grunt --save-dev
So two things should have happened from that command:
- The grunt task runner gets installed locally in a
node_modulesfolder below the root of your project. - Your
package.jsonfile gets modified to include adevDependenciesobject with agruntproperty. (This is why that--save-devoption was important.)
{
  "name": "Spotify-LibBrowser",
  "version": "0.1.0",
  "devDependencies": {
    "grunt": "~0.4.2"
  }
}
This means that anyone coming to your project can simply clone your repository and run npm install. The
Node package manager will read the package.json file and install the dependencies listed there. Of course,
this implies that the package.json file needs to be part of the repository but the big advantage of this
is that we don’t need to clog up the repository with all of the dependencies. So, go ahead and add node-modules
to your .gitignore file (or whatever the ignore mechanism is for your type of version control) and commit
this with your package.json file.
Don’t worry too much about that strange tilde ~ before the version number. It’s just a way of
specifying a version range in npm instead of tying it
down to a specific version. It really means: ‘get the latest version of grunt greater or equal to 0.4.2
but less than 0.5. In other words, if there’s been a point release then get it - you probably want any
bug fixes, etc, BUT if the major or minor versions increase I’m going to have to test it first to make
sure it still works so don’t update to that’.
As a quick test to check that everything has installed correctly so far, try running the grunt command.
You should see the following error…
Ian.Reah@IANREAH ~/Spotify-LibBrowser (master)
$ grunt


A valid Gruntfile could not be found. Please see the getting started guide for
more information on how to configure grunt: http://gruntjs.com/getting-started
Fatal error: Unable to find Gruntfile.
If you see this then it means the Grunt CLI is installed okay and it found your local installation of the Grunt task runner, but then it didn’t know what to do with it because we haven’t defined any tasks for it to run yet. Let’s do that now.
JSHint: Our first Grunt task
The process for adding each task to the build is more or less the same. We’ll go through the first one in detail.
1. Install the task
The code for a task is installed as a node module. You can write your own but,
unless you’re doing something pretty obscure, there’s probably already one available.
Once you’ve found (or written) the task you want, install it locally with npm using the --save-dev option (so it
gets added to the package.json file).
Ian.Reah@IANREAH ~/Spotify-LibBrowser (master)
$ npm install grunt-contrib-jshint --save-dev
2. Configure the task
The configuration for all tasks is held in a Gruntfile.js file in the root of your project. Tasks are configured by
passing in an object hash to the grunt.initConfig function (within a module.exports wrapper function, as shown below).
The configuration for a particular task is usually held in a property of this object hash with the same name as the task.
This is what my Gruntfile.js looks like with the JSHint task configured:
module.exports = function(grunt) {
  grunt.initConfig({
    jshint: {
      files: ['Gruntfile.js', 'scripts/**/*.js', 'specs/**/*.js'],
      options: {
        ignores: ['scripts/jquery.tmpl.js', 'scripts/jquery-1.7.1.min.js',
          'scripts/knockout-2.0.0.js']
      }
    }
  });
};
The configuration options for the JSHint task should be fairly self-explanatory. Basically, examine all of my JavaScript files, but ignore the third-party files specified.
3. Load the task
To let Grunt know which of our npm modules we want to run as tasks we need to load them with the grunt.loadNpmTasks
function after the grunt.initConfig call.
module.exports = function(grunt) {
  grunt.initConfig({
    ...
  });

  grunt.loadNpmTasks('grunt-contrib-jshint');
};
4. Run the task
To see a list of available tasks run grunt --help and you’ll see them listed after the command’s usage instructions and options…
Ian.Reah@IANREAH ~/Spotify-LibBrowser (master)
$ grunt --help

...

Available tasks
        jshint  Validate files with JSHint. *

Tasks run in the order specified. Arguments may be passed to tasks that accept
them by using colons, like "lint:files". Tasks marked with * are "multi tasks"
and will iterate over all sub-targets if no argument is specified.

...
The JSHint task can be run with grunt jshint.
5. Automate it
So, we’ve run the JSHint task and had all of our potentially bad JavaScript pointed out to us! Now, it’s all very well to go through fixing a couple of the issues and then running the task again, and so on. However, Grunt is all about automation and saving us from repetitive tasks, so we can do better…
With grunt-contrib-watch we can configure it to automatically run our task whenever any of the files change. Because
grunt-contrib-watch is a grunt task itself then we repeat the same process to set it up:
npm install grunt-contrib-watch --save-devto install it- Add the
watchconfiguration to thegrunt.initConfigobject hash. The following configuration says, ‘whenever any JavaScript file changes, run the JSHint task’.
module.exports = function(grunt) {
  grunt.initConfig({
    jshint: {
      ...
    },
    watch: {
      files: ['**/*.js'],
      tasks: ['jshint']
    }
  });

  ...
};- Add the
grunt.loadNpmTaskscall to load the task
module.exports = function(grunt) {
  grunt.initConfig({
    ...
  });

  grunt.loadNpmTasks('grunt-contrib-jshint');
  grunt.loadNpmTasks('grunt-contrib-watch');
};- Run the task with
grunt watch
This time you’ll be able to fix some JSHint warnings and whenever you save the file then the JSHint task will be run again so you can keep track of which ones are left to fix. Eventually, you’ll see something like this…
>> File "scripts\album.js" changed.

Running "jshint:files" (jshint) task
>> 5 files lint free.

Done, without errors.
Completed in 1.747s at Tue Dec 31 2013 18:11:34 GMT+0000 (GMT Standard Time)
Waiting...
And, as you continue to work on your project, the JSHint will be continuously running in the background so you’ll see immediately if you cause any more JSHint violations!
Just one more note about JSHint before we move one. While you’re fixing the warnings make sure you understand them. It’s generally a bad idea to change the code if you don’t really understand why it’s a problem in the first place and you can, in some cases, end up introducing bugs.
Unit tests with jasmine
So we’ve actually added two grunt tasks now, jshint and watch. Let’s just whizz through another one to make sure we’ve
got the process nailed.
1. Install the task (and add it to our package.json as a dev dependency) - npm install grunt-contrib-jasmine --save-dev
2. Configure the task by specifying the task options in an object hash passed into the grunt.initConfig call in our
Gruntfile.js file
module.exports = function(grunt) {
  grunt.initConfig({
    jshint: {
      ...
    },
    jasmine: {
      src: ['scripts/album.js'],
      options: {
        helpers: ['specs/spechelper.js'],
        specs: ['specs/**/*.spec.js'],
        vendor: ['scripts/knockout-2.0.0.js']
      }
    },
    watch: {
      ...
    }
  });

  ...
};
In most cases you’d want to specify all of your JavaScript files in the Jasmine src option but for now I’m
just adding a simple test for one file. The purpose of this exercise is just to get the mechanism in place to
allow me to work in a more test-driven way from now on. I’m not aiming for 100% test coverage straight away.
The vendor option specifies any third-party dependencies that need to be loaded first. With the helpers
option you can specify any files containing mocks or other set up for the tests. These are loaded after the
vendor files. To run the simple test for the album.js file I just need a mock for the Spotify API and its
exports object…
spechelper.js:
exports = {};
sp = {};
Finally the specs option specifies the files containing your tests. Here’s the one basic test I added for now, just to make sure it’s all
set up properly…
describe("Album model", function () {
  it("should set name when constructed from a spotify album", function () {
    var mockSpotifyAlbum = {
      artist: "Led Zeppelin",
      cover: "spotify:image:c89be3d95870abb652c16deef6e3d3e5174710ff",
      name: "Led Zeppelin IV",
      uri: "spotify:album:1Ugdi2OTxKopVVqsprp5pb"
    };

    var album = new Album(mockSpotifyAlbum);
    expect(album.name()).toBe("Led Zeppelin IV");
  });
});
Check out the plug-in’s read me for more information about the configuration of the task and the Jasmine website for more details about writing Jasmine unit tests.
3. Load the task by adding a call to grunt.loadNpmTasks to the Gruntfile.js file
module.exports = function(grunt) {
  grunt.initConfig({
    ...
  });

  grunt.loadNpmTasks('grunt-contrib-jshint');
  grunt.loadNpmTasks('grunt-contrib-jasmine');
  grunt.loadNpmTasks('grunt-contrib-watch');
};
4. Run the task with grunt jasmine. (Remember you can always run grunt --help to check the list of available tasks and how to run them.)
5. Automate it by adding it to our watch task configuration…
module.exports = function(grunt) {
  grunt.initConfig({
    jshint: {
      ...
    },
    watch: {
      files: ['**/*.js'],
      tasks: ['jshint', 'jasmine']
    }
  });

  ...
};
…so now we can run grunt watch and every time we save a change to the JavaScript the jshint task will run and (assuming there are no JSHint errors)
then the unit tests will be run. Nice!
Publish it to the Spotify folder
To run the app in Spotify the files have to be in a specific folder:
- ~/Spotify (Mac OS X and Linux)
- “My Documents\Spotify” (Windows)
(Each app is in it’s own subfolder.)
Now, I always felt a bit uncomfortable working in this folder. You’ve got your whole repository in there and now we’ve added a boat load of grunt and node module files which have nothing to do with running the app in Spotify. I’d feel much better if I could keep all of this stuff away from the Spotify folder and only copy the necessary files over when I want to test the app in Spotify. Surprise, surprise - you can do this with a Grunt task. You know the drill by now…
- Install the task with
npm install grunt-contrib-copy --save-dev - Add the task configuration to the
Gruntfile.jsfile
module.exports = function(grunt) {
  grunt.initConfig({
    getSpotifyFolder: function() {
      var root;
      if (process.platform == 'win32') {
        root = process.env.USERPROFILE + '/Documents';
      } else {
        root = process.env.HOME;
      }

      return root + '/Spotify/Spotify-LibBrowser/';
    },
    ...
    copy: {
      main: {
        src: ['manifest.json', 'index.html', 'images/*', 'scripts/*', 'styles/*'],
        dest: '<%= getSpotifyFolder() %>'
      }
    }
  });

  ...
};
The manifest.json and index.html along with any images, scripts and styles are all we need to run the app in Spotify.
Notice that we’re now taking advantage of the fact that the grunt configuration is actual JavaScript (not just JSON) by including a function to determine the
path for the Spotify folder. Also we can template values within <% %> delimiters. The config object is the context when these templated values are resolved,
which is why we can call getSpotifyFolder to set the value for the dest option in the copy task configuration. You can read more about using templates
to configure tasks in the grunt documentation.
- Load the task by adding a call to
grunt.loadNpmTasks('grunt-contrib-copy')to theGruntfile.jsfile - Run the task with
grunt copy - Automate it by adding it to our
watchtask configuration
module.exports = function(grunt) {
  grunt.initConfig({
    ...
    watch: {
      files: ['**/*.js'],
      tasks: ['jshint', 'jasmine', 'copy']
    }
  });

  ...
};
So running grunt watch now will run the jshint, jasmine and copy tasks whenever there are any JavaScript changes in the project. The advantage is that,
by default, the chain of tasks executed by the watch task stops as soon as any task fails. In other words, it will only end up in the Spotify folder if there
are no JSHint errors in the JavaScript and all unit tests pass.
Make a Continuous Integration build with Travis
We’ve got all our tasks set up locally, and of course, no one would ever dream of publishing changes to the remote repository without first making sure all of the tasks run successfully! Nevertheless, it’s still important to have an automated build that does a clean checkout and runs all of the tasks whenever anything gets pushed to the remote repository. There may be some local dependencies you’d overlooked that could cause problems if somebody else tries to pull your changes, for example. An automated build catches things like this early and gives you some added confidence that all is well with your code.
For this I used Travis. It’s integrated with GitHub and it’s really easy to get started.
For a Node.js project, Travis runs npm test to run the test suite. So, once you’ve
set up the GitHub service hook
and added your .travis.yml to your project,
you need to tell Travis what running the test suite actually means. In our case, this means telling it which Grunt tasks to run.
Use the scripts configuration in the package.json to tell it to run our jshint and jasmine tasks…
{
  ...
  "scripts": {
    "test": "grunt jshint jasmine --verbose"
  },
  ...
}
(The --verbose option can be useful, especially if you find yourself in a ‘but it works on my machine’ situation!)
Finally, there’s just one little gotcha we need to work around to get this to work. Remember how we didn’t make the Grunt CLI a dev-dependency
as typically that’s installed globally? Well each build is deliberately run in a vanilla environment so the CLI won’t be available from scratch.
We can tell Travis to install the Grunt CLI first by using the before_install configuration in the .travis.yml file.
My .travis.yml file looks like this…
language: node_js
node_js:
  - "0.10"
  - "0.8"
before_install:
  - npm install -g grunt-cli
Now you can grab your status badge and wear it with pride (or just stick it on your README file)…

…you’re now well on your way to cleaning up your act!
1. I really hope it's green while you're reading this!
About
I work as a Software Developer at Nonlinear Dynamics Limited, a developer of proteomics and metabolomics software.
My day job mainly involves developing Windows desktop applications with C# .NET.
My hobby/spare-time development tends to focus on playing around with some different technologies (which, at the minute seems to be web application development with JavaScript).
It’s this hobby/spare-time development that you’re most likely to read about here.
Ian Reah