
Cross-platform MVVM with ReactiveUI and Xamarin
Usually the development projects I work on in my own time are quite different to the sorts of things I do in my day job - just to broaden my knowledge a bit.[1] It sometimes happens though that, once you start thinking about how you’re going to implement something, you begin to wonder if .NET isn’t really the best tool for the job anyway! Well, if that happens, don’t dismiss it too quickly. It could actually be a viable option - even if you’re working on some non-Microsoft platforms…
In this post I’m going to describe how I took the View Model and non-UI code from a simple desktop WPF application and re-used the code in an Android application built with Xamarin.
A bit about the application
TurboTrainer is a really simple application that loads in a GPX file and plays it back in real time, displaying the route’s current gradient on the screen.[2] I did say it was simple…

The main thing that makes .NET a good fit is that the ‘replaying’ of the GPX route, updating the displayed gradient at the appropriate time intervals, becomes fairly simple using Rx’s Observable.Generate…
var firstSection = sections.FirstOrDefault();
if (firstSection == null)
{
    return Observable.Empty<GpxSection>();
}

var sectionsEnumerator = sections.Skip(1)
                                 .Concat(new GpxSection[] { null })
                                 .GetEnumerator();

return Observable.Generate(initialState: firstSection.TimeTaken,
                           condition: x => sectionsEnumerator.MoveNext(),
                           iterate: x => sectionsEnumerator.Current == null ?
                                         TimeSpan.Zero :
                                         sectionsEnumerator.Current.TimeTaken,
                           resultSelector: x => sectionsEnumerator.Current,
                           timeSelector: x => x,
                           scheduler: scheduler)
                 .StartWith(firstSection);
And (probably more impressively), even though the above code is all about scheduling and timing, it can still be unit tested by using the time-bending magic of the TestScheduler. (Have a look at these unit tests in TurboTrainer’s GitHub repository to see some examples of using the TestScheduler to test this code.)
As well as the above code, the project also includes…
- auto generated code[3] for the XML deserialisation of the GPX files
- code for calculating the distance and gradient between two GPX points
- a ReactiveUI view model …unit tested, of course!
- a WPF window with the bindings to the view model set up in the mark up, and very little in the code-behind.
Fair enough. A pretty typical WPF application.
But if you’re using the app, you might not want to use your desktop or laptop. A mobile app might be more convenient. And, of course, if we’re going to write a mobile app, we’re not going to narrow our user-base to only those with a certain type of device. But porting all of that code to each of the native platforms sounds like far too much hard work!
Well, Xamarin claims that you can ‘write your apps entirely in C#, sharing the same code on iOS, Android, Windows and Mac’. And, because I implemented my view model with ReactiveUI (which now has support for Android and iOS Xamarin applications) I should be able to re-use the view model also. In other words, pretty much everything apart from the UI itself could be shared between the platforms!
To put it to the test, let’s see if I can take all of that code (apart from the WPF window) and use it in a Xamarin Android application…
Creating an Android ReactiveUI project in Xamarin
To create the basic skeleton of the project and get all the assemblies you need…
- Create a new solution using the Android Application template.
- Add the Reactive Extensions component from the component store. (Find out how.)
- Grab the
ReactiveUIandReactiveUI.Androidassemblies from the starter-mobile project and reference them in your project. (They’re in this folder.)
If you prefer, you could just skip this and start with a clone of the starter-mobile project as described here. I find, when I’m trying out new stuff like this, that I get a better understanding of what’s going on if I build things up from scratch myself…it’s up to you.
Next, we need to find a way of sharing the code between the WPF application and the Xamarin Android application. There are a few ways to do this, including building the shared code into a Portable Class Library (PCL). For this small project I went with straight-forward file-linking. I liked the convenience of being able to edit the shared code in whichever project I was currently working on and for it to be ‘magically’ updated in the other. But this also makes it quite easy to make some changes in one project which cause compiler errors in the other so I could see this approach becoming unwieldy in a bigger project. Another drawback of the file-sharing approach is that if you add or delete files in the shared folder you have to do it in both places. Again, it’s up to you!
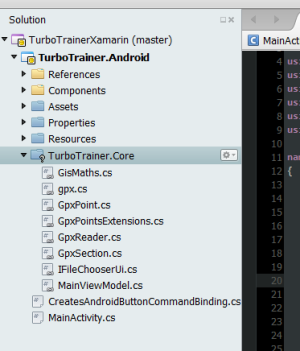
The TurboTrainer.Core folder doesn’t really exist - it links to the shared files in the WPF application.
Finally, we need to make some changes to the MainActivity to get it ready for MVVM and the ReactiveUI framework. Make it implement IViewFor<MainViewModel> and derive from ReactiveActivity instead of a plain Activity…
public class MainActivity : ReactiveActivity, IViewFor<MainViewModel>
{
    #region IViewFor implementation

    public MainViewModel ViewModel { get; set; }

    object IViewFor.ViewModel
    {
        get { return ViewModel; }
        set { ViewModel = (MainViewModel)value; }
    }

    #endregion

    ...
ReactiveUI Bindings
If, like me, you’ve only ever used ReactiveUI in a WPF application then you might not have realised that it has its own bindings. Here’s a very quick overview of ReactiveUI bindings, (you can find out more from Paul Betts’ NDC 2013 talk)…
This creates a 2-way binding:
this.Bind(ViewModel, vm => vm.Username, view => view.Username.Text);Here’s a one-way binding (from the View Model to the View):
this.OneWayBind(ViewModel, vm => vm.ShouldShowSpinner,
  view => view.Spinner.Visibility);
This also illustrates a built-in converter (binding from a bool to a System.Windows.Visibility). You can extend the built-in ones by registering your own custom converters.
Here’s an example of binding to a command:
this.BindCommand(ViewModel, vm => vm.DoLogin, view => view.LoginButton)There are a series of classes that know how to make command bindings (for example, by looking for a Command and CommandParameter property, or, by looking for a Click handler). The framework looks at the view property passed in (LoginButton in the above example) and chooses the one most appropriate for that type. (Again, you can extend these by registering your own. There’ll be a bit more about this later!)
Of course, in a WPF application it’s easier just to define your bindings in the XAML mark up and let the WPF binding framework do its job. There are still plenty of benefits to using ReactiveUI with the WPF binding framework, though. For example, you get less verbose notifying properties…
public GpxSection CurrentSection
{
  get { return currentSection; }
  set { this.RaiseAndSetIfChanged(ref currentSection, value); }
}
…and the benefit of being able to compose your property update handling…
this.WhenAny(x => x.ViewModel.CurrentSection, x => x.Value)
    .Where(x => x != null)
    .Buffer(TimeSpan.FromSeconds(3))
    .Where(x => x.Count != 0)
    .Select(x => new GpxSection(x.First().Start, x.Last().End))
    .ObserveOnDispatcher()
    .Subscribe(x => gradientText.Text = string.Format("{0:0.0}%", x.Gradient));
…and probably a few other benefits that I won’t go into here.
In our Android app we have to rely on ReactiveUI to provide the bindings. Set the ViewModel and then set up the bindings in the OnCreate of the MainActivity…
ViewModel = new MainViewModel(RxApp.TaskpoolScheduler, this);

GradientText = FindViewById<TextView>(Resource.Id.gradientText);
this.OneWayBind(ViewModel, vm => vm.CurrentSection.Gradient, v => v.GradientText.Text,
  x => string.Format("{0:0.0}%", x));

LoadGpxButton = FindViewById<Button>(Resource.Id.loadGpxButton);
this.BindCommand(ViewModel, vm => vm.LoadGpxDataCommand, v => v.LoadGpxButton);
Notice that this means naming our controls in the UI mark up and looking them up by their id in code. Maybe a little more effort than just defining the binding directly in the UI mark up but I’m pretty sure it’s a lot slicker than trying to do it in a non-MVVM way.
Scheduling and the ObservableAsPropertyHelper
The first time I plugged the View Model into the Android application it crashed with a CalledFromTheWrongThread exception. It’s the old ‘you’re trying to update the UI from a different thread, you idiot’ error…such a rooky mistake! How embarrassing. Really, I should know better!
But, wait a minute…WPF has the same kind of thread affinity requirements. Why didn’t I see the problem in the WPF version? Well, it turns out we’ve been spoilt in the WPF world. In WPF, suppose you have a notifying property…
public GPxSection CurrentSection
{
  get { return currentSection; }
  set { this.RaiseAndSetIfChanged(ref currentSection, value); }
}
…bound to a text block using the WPF binding framework…
<TextBlock Text="{Binding CurrentSection.Gradient, StringFormat={}{0:0.0}%}" />…and if, for example, you have values being produced on a different thread, you can quite happily take these values as they appear and update the property…
gpxPoints.Replay(backgroundScheduler).Subscribe(x => CurrentPoint = x);The WPF framework will make sure we’re back on the right thread before updating the UI.
If, however, the WPF binding in the XAML was replaced with a ReactiveUI one in code then we do get the same issue in the WPF app as in the Android one.
There’s a simple fix - use the Rx ObserveOn method to make sure the items produced are observed on the correct thread…
gpxPoints.Replay(backgroundScheduler)
         .ObserveOn(RxApp.MainThreadScheduler)
         .Subscribe(x => CurrentPoint = x);
But there’s a better way…a more ‘ReactiveUI-y’ way. Instead of just using a normal Rx subscription to update a view model property from an observable, we can use an ObservableAsPropertyHelper…
To do this, we give our class an ObservableAsPropertyHelper member instead of the property’s backing field…
private readonly ObservableAsPropertyHelper<GpxSection> currentSection;…and set the ObservableAsPropertyHelper with the return value from a call to ToProperty. (The lambda expression specifies which notification to raise when the value updates)…
currentSection = gpxPoints.Replay(backgroundScheduler)
                          .ToProperty(this, x => CurrentPoint = x);
The property itself becomes a read-only property returning the Value from the ObservableAsPropertyHelper…
public GpxSection CurrentSection { get { return currentSection.Value; } }So the CurrentSection property will always return the latest value produced by the observable and the property changed notification will be raised whenever a new value is produced. And this time, because we’ve been a bit more explicit with what we’re trying to do, the ReactiveUI framework can help us out and take care of the dispatching for us so the UI updates happen on the correct thread. We didn’t need to specify the thread to observe on.
Binding to Commands
There’s just one last thing I should mention. You know in that very brief discussion of ReactiveUI bindings earlier I mentioned about the set of classes that know how to create a command binding to various objects and how the framework can choose the most appropriate one? Well, at the time I was working on this project, the Android versions of these classes hadn’t been implemented yet. So it was time to find out how to implement my own and register it with the framework…
This is done by implementing an ICreatesCommandBinding. If you look at one of the existing implementations you can see it’s done in as general way as possible using reflection to look for certain properties on the object (e.g., if an object has a Command property which returns an ICommand and a CommandParameter property then I know how to bind to it). Unfortunately, the Android controls aren’t as consistent with their naming, making it quite awkward to use such a general approach. I guess this is why the Android command binding classes are a bit behind. However, it’s pretty straight-forward to implement one for a specific control type. I only need one to bind a command to an Android.Widget.Button…
public class CreatesAndroidButtonCommandBinding : ICreatesCommandBinding
{
  public int GetAffinityForObject(Type type, bool hasEventTarget)
  {
    return typeof(Button).IsAssignableFrom(type) ? 2 : 0;
  }

  public IDisposable BindCommandToObject(ICommand command, object target,
    IObservable<object> commandParameter)
  {
    return BindCommandToObject<EventArgs>(command, target, commandParameter, "Click");
  }

  public IDisposable BindCommandToObject<TEventArgs>(ICommand command, object target,
    IObservable<object> commandParameter, string eventName)
  {
    var button = (Button)target;

    var disposables = new CompositeDisposable();

    disposables.Add(Observable.FromEventPattern(button, eventName)
                              .Subscribe(_ => command.Execute(null)));
    disposables.Add(Observable.FromEventPattern(command, "CanExecuteChanged")
                              .Subscribe(x =>
                                button.Enabled = command.CanExecute(null)));

    return disposables;
  }
}
The GetAffinityForObject is used to determine the most appropriate binding creator. It’ll use the one that returns the highest value for a given type of object. The documentation says “when in doubt, return ‘2’ or ‘0’” so that’s what I did!
This is how I registered it…
var resolver = (IMutableDependencyResolver)RxApp.DependencyResolver;
resolver.Register(() => new CreatesAndroidButtonCommandBinding(),
  typeof(ICreatesCommandBinding));
So, if you find you’re getting exceptions like “Couldn’t find a command binder for…” then you may need to do something similar.
Summary
And there you have it…the Android application now works just like the WPF one (and shares most of the same code). All I really needed to do was…
- Learn how to use ReactiveUI bindings
- Implement an
ICreatesCommandBinding(which will probably be part of the default framework eventually) - Change the view model to use an
ObservableAsPropertyHelper(which I probably should’ve been using anyway)
The rest of the Android application is just the axml layout equivalent of the WPF window and some code in the MainActivity for browsing for a GPX file. Nice!
1. Of course, learning new tools and technologies brings plenty of benefits to my .NET work as well. (Spend some time playing around with a more dynamic or functional language, for example, and you'll find it can often help give a different viewpoint or approach while working on a problem in .NET!)
2. The idea is to be able to use it with an exercise bike or turbo trainer to make your workouts a bit more realistic by following an actual outdoor route. You'd just watch the display and adjust the trainer's resistance according the displayed gradient.
3. Using xsd code generation (The less code I have to write myself is only going to mean fewer bugs, right?)
Chrome App Launcher - The Start Menu To The Web
I’ve been getting quite into using some of the “For your desktop” Chrome apps this last month. I really like the idea of your computer becoming less like ‘the canonical place for storing all your apps and data’, and more like ‘just another device where you can log on to access your stuff’.
After all, we’ve been treating our phones like this for some time now. (When was the last time you got a new phone and thought, “Gah! Now I’ve got to transfer all my contacts and everything”?) So why not treat your PC the same? These new types of Chrome apps feel like a step towards this.
So what are they?
They’re a new breed of Chrome app. They work offline and outside of the browser. They have better access to the device’s storage and other hardware - more than they would normally get from within the confines of the browser.
In other words, they look and behave a little bit more like native desktop apps rather than the usual ‘in the browser’ apps, but with a few key differences. For instance,
- they appear on all your desktop devices where you sign in to Chrome, and,
- their data is stored in the cloud and sync’d across devices.
But what’s that pinned to my taskbar?
After I installed my first “For your desktop” app I got this strange new thing pinned to my taskbar…

Now I usually really hate it when stuff like this happens. I normally even delete the desktop shortcut right after I’ve installed some new software. How dare they be so presumptuous as to think that the app I’ve just installed is going to be so important to me that it needs to be there in front of my eyes at all times? (Heaven help any installation that tries to install a browser toolbar or change my home page!)
For some reason I decided to check out this little intruder first before banishing it to the recycle bin. Turns out it was the Chrome App Launcher. When you open it you get quick access to all of your installed apps (along with any ‘old-style’ chrome apps or shortcuts that you previously had on the Chrome New Tab page if you used it).
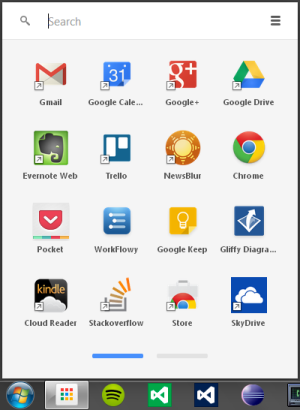
You see the real power of it though when you open it and just start typing. You get an on-the-fly search and filter of all your apps, shortcuts, bookmarks and browsing history, as well as google search suggestions. I like!
So, I’ve kept the app launcher pinned to my taskbar. In fact, as you can see, I’ve gone so far as to move it into pole position - right next to the windows start button. It’s as if I now have two start menus…
- I can hit the windows start button
 and start typing to get access to my PC-based stuff, or
 - I can hit the windows start button +1[1] and start typing to get access to my web-based stuff.
I keep telling myself that I’ve been taken in by Google’s Trojan horse in their attempt to take over my computer…but I just find it really useful! You should give it a try.
Here are some of the apps I’ve been using most so far…
Apps I use most
-
Pocket: I’m using this as my ‘save-for-later’ app to, well, save things I find on the web so I can read them later. It has browser extensions for saving things from the browser and accompanying mobile apps for iOS and Android. I’ve even been using its Favourites and Tagging features as a simple bookmark manager to organise things I want to keep around for reference after I’ve read them.
-
Workflowy: This is a note taking and task management app. It’s pretty minimalistic but it has quite a novel approach to how your work is organised. Instead of the usual multiple ‘documents’ organised into ‘folders’, everything is one big document but you zoom in and out to focus on the piece of work you’re interested in. I’ve found that, after learning a handful of keyboard shortcuts, it’s very easy to get around and feels like quite a natural way of organising things. If you do want to give it a try, you can use this link and we’ll both get a bit extra free space.
-
Keep: I’ve been using this for short-lived notes and reminders. The sorts of things I would normally put on a sticky note but they get sync’d across my devices.
-
Gliffy: Actually, this was one of the first apps that caught my eye but I haven’t really used it much yet. It’s an app for creating diagrams and has features for creating UML-type class diagrams and UI mock ups (among others). I’ve often found myself wishing I had something like this at my fingertips so I’m sure it’s going to get some use soon.
1. You knew you could do this, right? Windows key plus a number launches the program pinned at that position in the taskbar.
A Bootstrap Makeover - Fluid AND Responsive?
To celebrate my website’s first birthday I decided to give it a bit of a makeover. I’m not exactly a prolific blogger but the previous design gave the impression that the site was all about the blog! And, a home page that just gives you the first screenful of the latest post? Well, that’s not going to grab anyone’s attention, is it?…
Instead, I wanted to give my coding projects more prominence and make the homepage a bit more interesting. Now, I’m not much of a designer but I hope that the new design is more eye-catching and gives my projects pride of place…
The redesign also gave me a chance to play around with Twitter Bootstrap. In my (so far) limited experience, Twitter Bootstrap seems to be everything it claims to be - it enables quick and easy website development even for non-designer types like myself, it helps to produce something that works well on a range of devices, and it doesn’t have much of a learning curve so it’s very quick to get started.

Having said that, though, one thing that wasn’t immediately obvious to me when starting out with Bootstrap v2.3.2 was the difference between the fluid system and the responsive features.
When would you want to use the fluid classes (.row-fluid, .container-fluid) over the responsive css? Would you ever want to use both?
Turns out it’s actually really straight-forward…
**Fluid: ** The fluid classes are all about percentages. In Bootstrap v2.3.2, the .container class gets a fixed width. As do the .span*[1] classes within a .row of the grid system. And, these widths really are fixed. They remain the same regardless of the size of the window. However, switch to a .container-fluid class or put the .span* classes in a .row-fluid then the elements get a percent width instead so they resize ‘fluidly’ as the window resizes.
**Responsive: ** Now, if you include the responsive css in your project you’ll get a load of media queries. These are mostly based on min-width and max-width to resize elements for different screen sizes, etc. For example, the .container class and .span* classes within a .row still get a fixed width but that width will change discretely based on the size of the window.
Fair enough - so that seems really obvious now. I guess I was just being slow! Fluid makes things resize by percentages, without it they get a fixed pixel width. Responsive uses media queries to adjust the fixed width values based on screen size. But that doesn’t answer my last question about whether you would ever want to use the fluid classes and the responsive media queries. After all, the media queries don’t have any effect on the widths of the fluid elements as they resize based on percentages.
Well, there are other advantages to using the responsive css that are also useful with the fluid classes…
- The responsive css controls more than just the widths of the container classes. It also resizes headings, for example, to keep things looking nice on all devices.
- You get some convenient utility classes with the responsive css for hiding/showing elements on different devices (e.g.,
.visible-phone,.hidden-phone, etc)[2] - The
.span*classes within a.row-fluidwill get stacked below a certain size instead of remaining side-by-side and getting smaller and smaller. - There are some responsive components (such as the collapsing navbar) which require the responsive features.
The answer, then, is a definite ‘yes’ - there are plenty of cases where you’d want to use the responsive and fluid features together. In fact, having gone through all of that, it seems that the default in Bootstrap v3.0 is now to include both fluid and responsive features from the start. Where v2.3.2 gave the choice of fluid and non-fluid versions of some classes (.container/.container-fluid, .row/.row-fluid), v3.0 has done away with the fixed grid and simplified the classes. (.container and .row now behave in a fluid way.) Similarly, the responsive css is now built in and no longer a separate stylesheet.
So, it looks like both fluid and responsive is the way forward and the changes in the new Bootstrap[3] make less of a distinction by including them both by default. Still, it’s useful to understand a little bit about what’s going on behind the scenes in the frameworks you use.
1. .col-md-* in Bootstrap v3.0
2. In v3.0 these have been renamed based on size rather than device type, i.e., visible-sm, visible-md, visible-lg, hidden-sm, hidden-md, hidden-lg.
3. There's more information about migrating to Bootstrap v3.0 in the documentation or in the announcement blog post.
About
I work as a Software Developer at Nonlinear Dynamics Limited, a developer of proteomics and metabolomics software.
My day job mainly involves developing Windows desktop applications with C# .NET.
My hobby/spare-time development tends to focus on playing around with some different technologies (which, at the minute seems to be web application development with JavaScript).
It’s this hobby/spare-time development that you’re most likely to read about here.
Ian Reah